If you already own a DJI Osmo Mobile gimbal, you might be sitting on one of its most underrated features. With the DJI Mimo app, your Apple Watch can act as a live view monitor and remote controller, letting you start recording, adjust framing, and even activate subject tracking without touching your phone. For solo creators, travelers, or anyone tired of running back to hit record, this setup feels surprisingly liberating. Here’s how to use it properly, and what to expect…
Apple Watch control works with several current DJI smartphone stabilizers, including the Osmo Mobile 6, DJI OM 7P, and the latest DJI Osmo Mobile 8. All of these are 3-axis stabilized gimbals designed to eliminate shaky footage. The Osmo Mobile 8 is especially popular among creators because it comes with 360-degree horizontal rotation for immersive shots, a built-in extension rod and tripod, as well as DJI’s upgraded ActiveTrack system for people, cats, and dogs.
To enjoy the fun of remote shooting, you’ll need the DJI Mimo app version 2.0.4 or later, an iPhone running iOS 16 or newer, and an Apple Watch running watchOS 9 or later.
Step 1: Connect everything properly
Start by pairing your iPhone and Apple Watch as usual. Then install the DJI Mimo app on both devices.
Power on your Osmo Mobile gimbal and make sure the battery is well charged. Open DJI Mimo on your iPhone and connect the gimbal via Bluetooth. Once connected, enter the camera view inside the app.
Only after your phone and gimbal are communicating properly should you open DJI Mimo on your Apple Watch. The watch will automatically mirror the camera interface.
If you run into connection issues, check that Bluetooth is enabled and disconnect other nearby Bluetooth accessories temporarily. Apple devices can get crowded on that front.
Step 2: Start shooting from your wrist
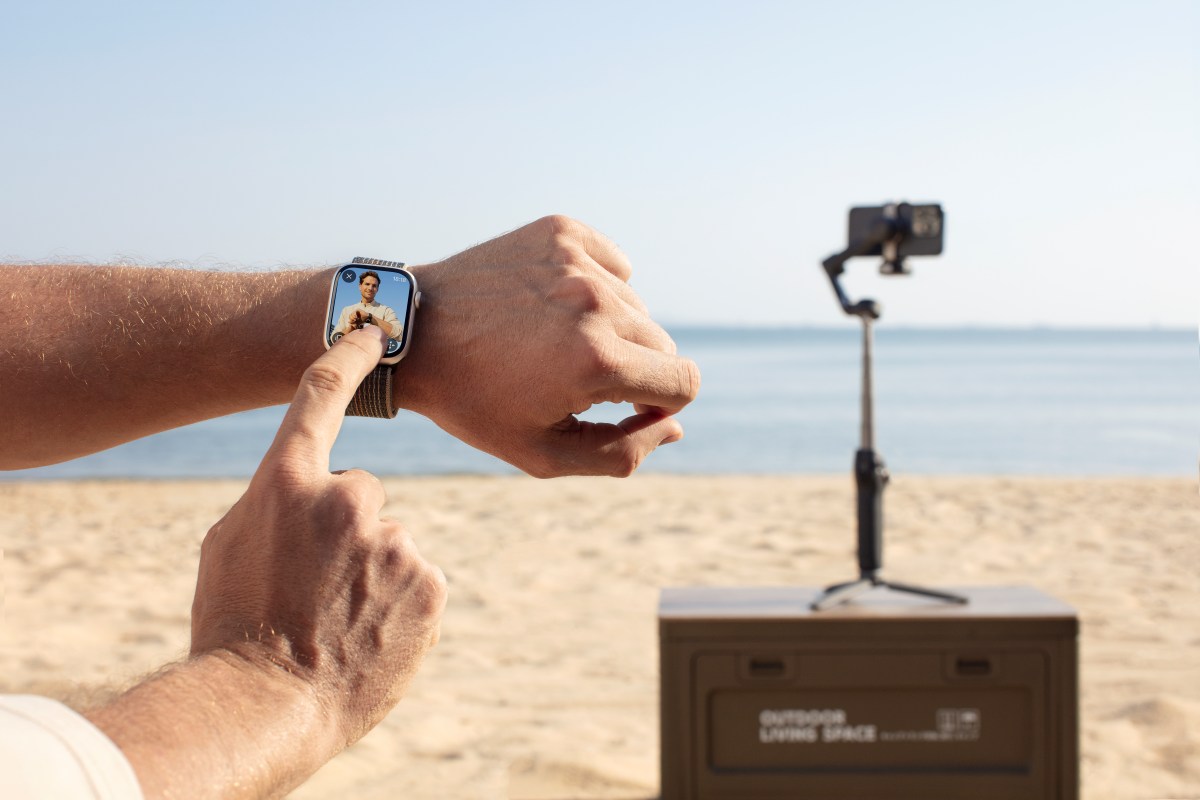
Once the camera view appears on your Apple Watch, you can begin remote control.
You’ll see a live preview feed on your watch. The resolution is lower than your iPhone’s display because of bandwidth limits, but that does not affect the quality of the footage being recorded.
From your watch, you can start and stop recording, switch between photo and video modes, and adjust framing.
Inside the control center, a virtual joystick allows you to tilt and pan the gimbal. If your framing drifts, tap the recenter button and the gimbal instantly snaps back to its default position.
You can also toggle between portrait and landscape mode, which is especially useful if you create content for TikTok or Instagram Reels and switch formats frequently.
The effective operating distance is roughly eight meters in open space, which is enough room for most indoor shoots, workout sessions, cooking videos, or small outdoor scenes.
Step 3: Use ActiveTrack for hands-free filming
One of the most powerful features available through the watch interface is ActiveTrack.
Tap to activate it, and the gimbal automatically locks onto the subject in the center of the frame. Whether you’re walking toward the camera, demonstrating a product, or filming kids playing, the gimbal keeps you centered.
This feature is particularly strong on the Osmo Mobile 8, which uses DJI’s latest tracking algorithms to maintain focus even when subjects briefly move out of frame. For solo creators, this effectively turns your setup into a one-person production crew.
After you finish shooting
You can preview the most recent photo and the first frame of your latest video directly on your Apple Watch. For full playback, editing tools, and exporting, you’ll return to the DJI Mimo app on your iPhone.
If you’re using accessories like the DJI Mic 3, connect the receiver directly to your phone using the included adapter instead of relying on Bluetooth. This helps avoid signal conflicts when your watch is also connected.
Smartphone stabilization has improved dramatically over the past few years, but mechanical 3-axis gimbals still produce smoother cinematic motion than software stabilization alone. By combining a stabilized Osmo Mobile with Apple Watch control, you remove the final friction point: physically touching your phone. It’s especially useful for travel vlogging, fitness demos, cooking tutorials, group photos, and solo storytelling content.
Instead of guessing whether you’re framed correctly, you can check composition in real time from your wrist. And once you get used to it, going back to a tripod-only setup feels limiting.
More: DJI Osmo 360 update adds Adaptive tone, better snow color
FTC: We use income earning auto affiliate links. More.


Comments