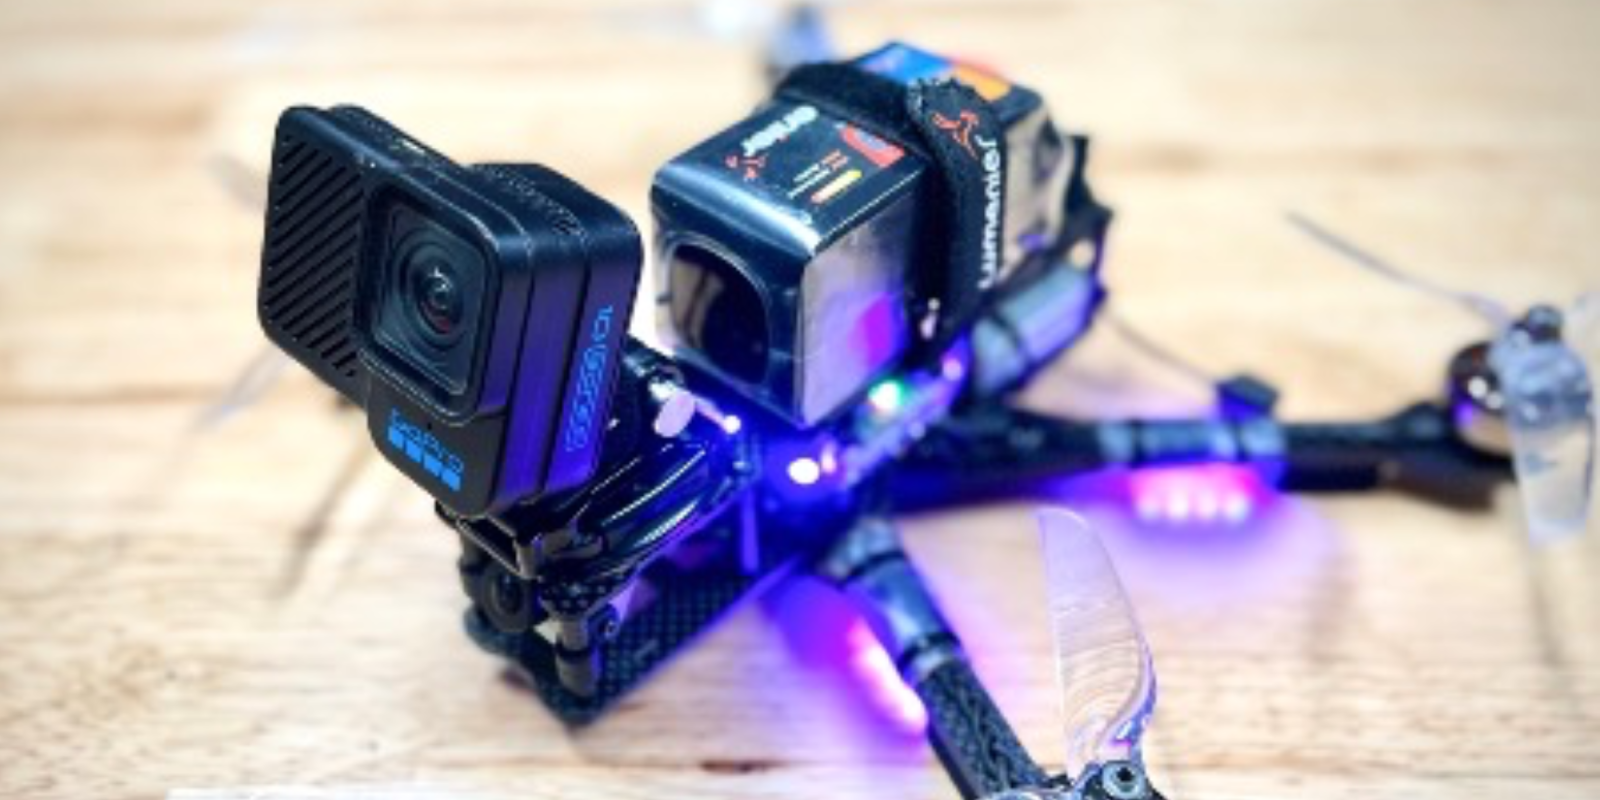
A brand new camera for FPV Drones from GoPro is about to hit the market. Called the Hero10 Black “Bones,” I was lucky enough to get an early production unit from GoPro for review. The short of it is that you get the same video quality of a GoPro 10 at a third of the weight – and at the same price! You don’t get the dual LCD screens or waterproofing, but the weight savings more than make up for it.
When it comes to flying a drone, weight is a huge issue. The less weight loaded on the drone, the more nimble and responsive it is. And, more importantly, the longer your flight times will be. For a cinema drone, that’s a HUGE deal.
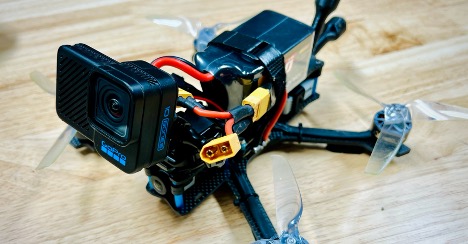
The camera came in a simple box with a small connection cable. The camera is light and feels a lot more fragile at first glance than your standard GoPro. Don’t let that fool you – this camera is TOUGH! I’ve crashed it a few times while testing it, and after dusting it off, it didn’t have a scratch on the lens. The lens is interchangeable just in case you do manage to destroy it, which is really convenient for a FPV action camera. It does have open slits for cooling around the case, and it is not waterproof like its sibling. So you can’t submerge it in water, but it is built tough.

You can power and control the Bones in six different ways: via the three-wire cable it comes with; the two buttons on the back; an external remote; your phone through regular wifi and the GoPro Quick app or your voice; and finally, with QR codes generated by the QRControl on your phone and at GoPro Labs’ QR code creator, which allows you change every imaginable setting on your camera and more instantly.
Wiring and mounting options for Hero10 Bones
The camera connector’s three wires are easy enough to wire directly to an available power and ground pad on your flight controller. The camera comes with its own BEC on board, and you can power it with a 2s-6s (5-27V) battery. If you have an available control pad on your FC, you can connect the yellow wire (5v) and, once setup in betaflight, you can trigger the shutter from your remote.
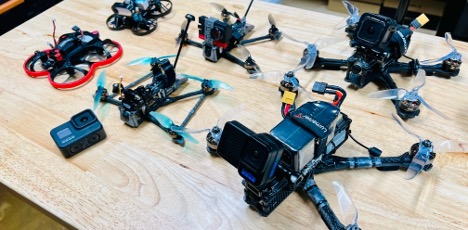
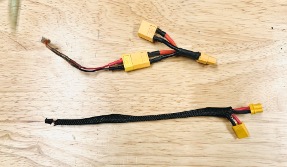
After having prepped three drones for this review, with the camera’s power and control wires soldered directly to the flight controller, I also soldered two separate harnesses to power the camera directly through the battery instead of the FC.
I can’t control the camera with the transmitter, but I can now move the camera more easily from drone to drone; test it on the bench without overheating other drone components; and just use it like a regular GoPro with a massive battery pack.
As for mounting the camera on top of the frames, I found that, with some light trimming and cleaning all the surfaces with rubbing alcohol, the standard GoPro mounts and adhesive pads have worked wonderfully on the 5-inch frames.
On the 4-inch and smaller drones, I used the GoPro clip mount, cut the clip bits off, trimmed the GoPro 3M adhesive to size, and taped them directly to the frame with great success.
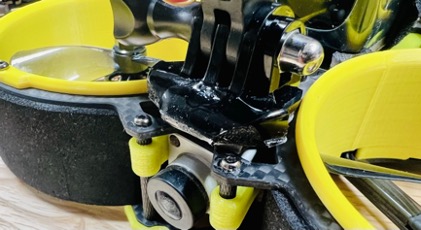
Try this method at your own risk – you may want to add some zip ties for added safety, but short of the flood of 3D-printed mounts I’m sure are coming for this camera, this solution works in a pinch.
Controlling the camera
You first need to bind the camera to the app by pointing the camera at a QR code. Once that’s done, you can preview and control the camera on your phone through the GoPro Quik app video editor.
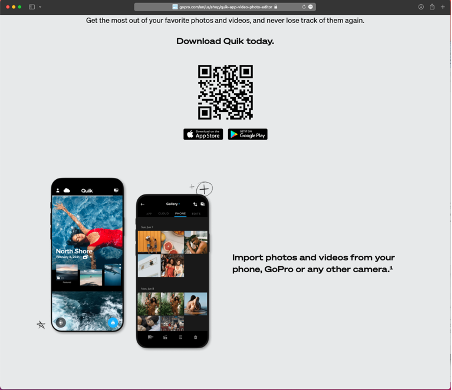
This is the only way you can preview the video from your camera. You can control almost all the settings of the camera through this app, but to unleash its true power, you’ll want to use the QRControler from GoPro Labs.
Once the app is installed, you have complete control of all the settings of the camera and more. This generates a QR code at the bottom of the phone’s screen that you point at the camera while it’s powered on. The camera blinks twice, and then the settings are instantly changed. You can save multiple QR codes to your phone’s picture library or instantly create new ones on the app.
Keep in mind your camera’s limitations when generating the QR code. If you generate a code for 5K at 120fps, your camera will default to the last settings used.
To make sure I was in the right mode, I would generate a QRcode with Wi-Fi on, check the camera on the Quik app to make sure it matches the QRControl settings, and then generate a new one with Wi-Fi off just to make sure I didn’t screw up something with my thumbs.
Once I got the hang of it, I found it much easier and faster to set everything up on the QRControl app and point it directly at the camera rather than fussing around with the Quik app and having to wait for the camera to join the Wi-Fi network and so forth.
It’s also the only way you can create custom commands like a command to start recording with a change in camera motion or sound pressure, or commands to add text overlays or logos. With Protune controls enabled, you have access to all the common features you would find in a DSLR: spot metering, bit rate, white balance control, ISO minimum and maximum, and much more. GoPro Labs has all kind of goodies online where new codes are being created and shared. Finally, you can also control the camera via voice and a remote, which as of this writing I haven’t tried.
Test flying the GoPro Hero10 Bones
First frame I tried the camera on was a Lumenier Qav-R 2 Deadcat 6-inch frame with 5-inch props on a 6S battery. It’s more of a freestyle frame, set up for long-range cruising. The camera was wired directly to the flight controller, but I kept pressing the power and the record button manually – old habits die hard.
The top of the frame has so much room – mounting the GoPro Hero10 Bones was very easy. I controlled the camera with the GoPro Quik app and tried the 4K 30fps with EIS at medium – and the footage looked great. Right out of the box, I got super sharp and crisp video. This is NOT the recommended settings for flying FPV, but I was just curious to see what kind of image quality I was getting without fussing around, and I was impressed.
I then used the QR code on my QRControler app on my phone to switch to 4K 4:3 at 60fps with Protune set to flat and a high bit rate. I flew a couple of 6S batteries, and once the files were on the computer, I downloaded the files and played them back through the GoPro player. You can apply ReelSteady and preview the effects in real time.
The results were buttery smooth and, full disclosure, I bought the full $99 license version immediately. You do have the option of paying for just the clips you want processed instead of getting the full license, but in my case, this is a tool I’ll be using quite a bit. It’s not going to make you fly like a pro, but it’s darn close to making you look like one.
Next, I moved to a more responsive and finely tuned XILO Phreakstyle 6S with 5-inch props. Just like the DeadCat frame, with having so much room on top of the frame, I was able to mount the camera on a full GoPro mounting plate and adhesive. I did have to snip the corner of the base plate a little to allow access to the top screws, but short of printing a custom mount, it’s working great.
This set up has the most punch of the bunch. The GoPro Hero10 Bones doesn’t even feel like it’s there. I can easily get seven-minute flight times on 1550 Lumenier batteries. The frame is super agile and responsive, even though I set up the camera out in front out of the way of the propellers.
I did get to test it in over 20-mile-per-hour winds, and although the ground was moving below me a lot quicker in one direction, the camera had little effect on its overall stability and responsiveness. The camera worked flawlessly with the QR codes, and I could record two different setups back to back very quickly – one in 5K 4/3 at 30fps, the second on 4K 4/3 at 60fps.
I then moved the camera with the battery harness to the smaller but just as responsive XILO Phreakstyle 4S with 5-inch props, and again, I could not tell I was dangling a 5.3K action camera in front of it.
Flight times were a bit shorter than the 6S setup at five minutes, but I was pushing the little guy around my backyards bushes pretty hard.
Being a third of the weight of the GoPro Hero10, I expected nothing less, but I was impressed with how little impact it had on the 5-inch 4S and 5S setups.
Moving to smaller 4-inch drones, I put the camera on a Flywoo Explorer LR4 and got similar pleasing results. The flight times were shorter, but the drone did not struggle to fly the camera. Upon landing, all the components remained cool with over a five-minute flight time on a 4S. When flying 3-inch or smaller drones, flight times get noticeably shorter and things start to get warm.
I put the camera on an iFlight BumbleBee v3 3-inch Cinewhoop 4S and took it out low in between the trees of my backyard. The camera performed flawlessly, with the resulting footage being very smooth. The flight times were in the three-minute range, and upon landing, all the motors were noticeably hot to the touch.
On the smallest frame I dared to mount the camera, BetaFpv’s 95x v3, I got one and a half to two minutes of flight time on a 4S 75OmAh battery. Upon landing from two back-to-back flights, the motors were getting hot, which is to be expected. The resulting footage looked amazing! It’s not a lot of time to be in the air, but you can film a lot in just two minutes.
GoPro Player desktop app and ReelSteady
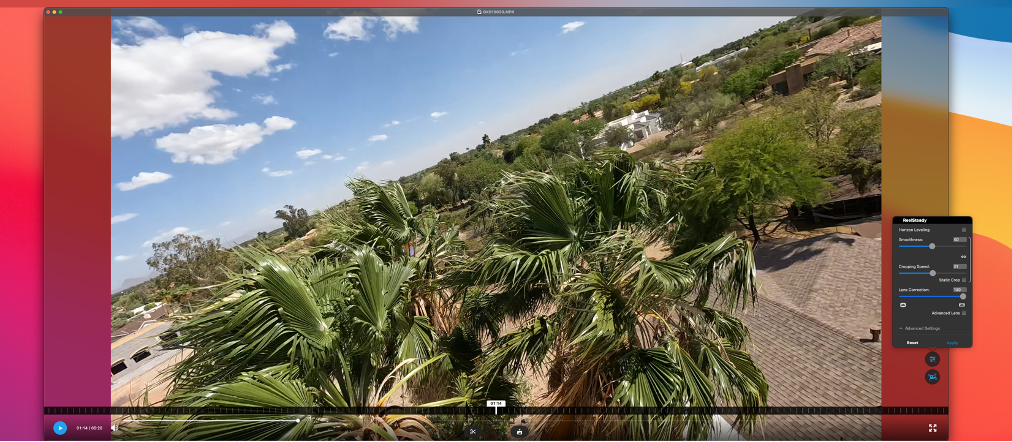
Once you have imported your footage from the SD card onto your computer, you can import your footage into your favorite video editor, but I would recommend using GoPro Player’s ReelSteady. If you are not familiar with ReelSteady, it is super easy to use, and the results are just fantastic. You can download the app here.
Anytime you click on one of your camera video’s app, it opens and a simple interface is presented to you. You can also import footage directly from the app in the usual “open and import” menu options. ReelSteady is a small icon on the bottom right of your screen with another settings button right above it. If you have mounted your rig properly, prepare to see amazingly smooth results.
One of my less tuned drones, prone to a lot of vibration, was a terrific test bed for ReelPlayer. I was surprised how well it did. Even though I could see quite a bit of vibration in the original 5K 4:3 30fps and 4k 4:3 60fps footage, ReelSteady did a fantastic job at taking most of it out. On the 4K 4:3 60fps, it’s almost flawless. The resulting video with ReelSteady out of the settings is sooo good.
And the footage you get on a properly setup frame is just amazing.
DroneDJ’S Take
Is sacrificing the robustness and ease of use of the traditional GoPro Hero10 worth the hassle for a third of the weight?
Absolutely! If you are trying to get these wild, incredibly tight, indoor/outdoor shots we’ve seen starting to pop up everywhere on social media and film, then it’s a resounding yes!
I hope people aren’t getting jaded by seeing so many incredible aerial shots. These shots take a ridiculous amount of skill. And with this camera, I can’t wait to see the boundaries of drone cinematography being pushed even further.
You will be hard pressed to get better image quality on such a small and light package. Yes, there are smaller cameras and lighter cameras, but they won’t have the image quality and camera control that the new GoPro Hero10 Bones has. With custom QR codes, 3D printed mounts and cases, this camera has endless uses.
FTC: We use income earning auto affiliate links. More.

Comments