DJI just released the Avata. It’s DJI’s second iteration of a ready-to-fly, first-person-view drone. The Avata is aimed at newcomers and professionals alike for indoor and outdoor FPV flying, preferably moving through a window. Here is our review of DJI’s Avata from someone that has flown FPV drones for years.
For people who have never flown FPV, a quick brief: It’s the closest thing to being a bird. It allows for unparalleled drone control and, until recently, had a steep learning curve.
The short review: the Avata is the only FPV drone that I could hand off to a total newcomer and have that person fly confidently around a room, out the window, and back again within a minute of instructions. The resulting 4k footage is stunning and buttery smooth.
If DJI’s goal was to “open up the excitement of flying an FPV drone to a broader audience,” they have succeeded, hands down.
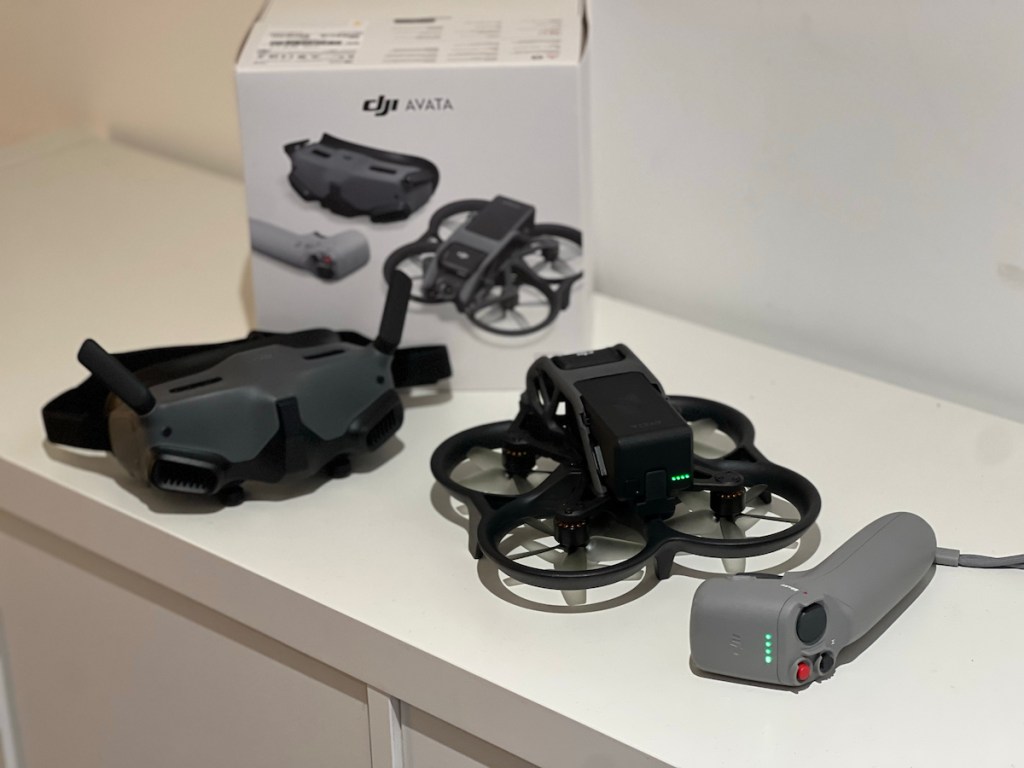
I was fortunate enough to get the Pro-view combo from DJI for this review. The combo contains two boxes, one for the Avata and the other for the Motion Combo, which includes the Goggles 2 and the motion controller remote. I was also sent a spare battery. The kit, as reviewed, would set you back $1,517. Not cheap, but if you are starting from scratch, you are getting a lot for your money.
Luckily I was in Europe when I received the Avata, which allowed me to test it in different situations and check out local regulations. At my first stop, Paris, I got to familiarize myself with all the components.
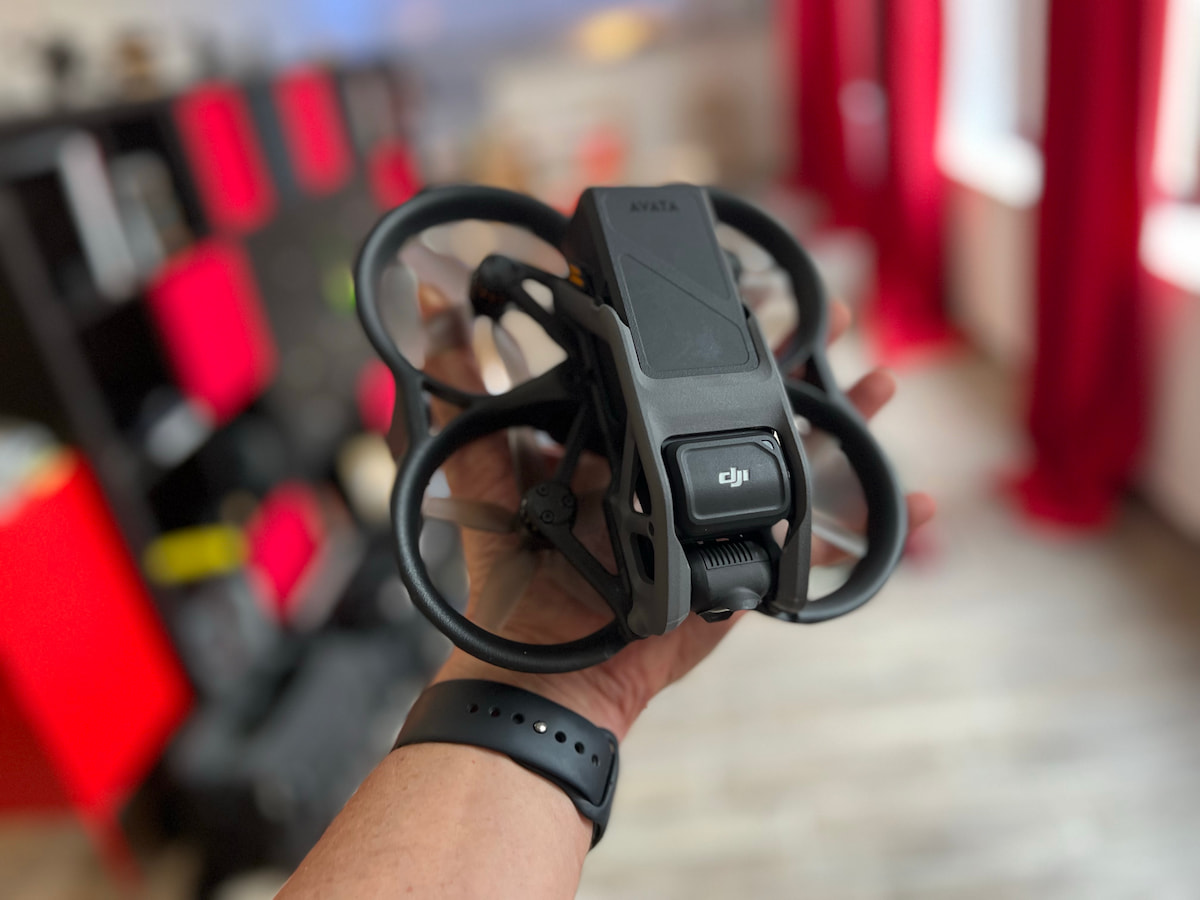
The Avata
The Avata came in its own box with a flight battery, single battery charger, two spare props, a screwdriver for the props, and manuals. Bought on its own, it would set you back $629. Not a bad option if you already have compatible remote and goggles.
The drone is tough, with a hard yet flexible exoskeleton that protects the props, camera, and electronics. The battery makes up a significant weight of the system at 162g. I love how easy it is to slide the battery into the frame – no more fidgeting with velcro straps and unsightly slippery connectors. Charging the battery was a breeze. The flexible power cable easily connected to the single charger, and the battery reached a full charge in about four hours.
The take-off weight is a hefty 410g. If this is your first drone, in addition to taking the TRUST test, you must register the drone to comply with FAA rules and regulations for drones over 249g.
The camera has a 1/1.7-inch CMOS sensor at an “effective” 48MP with a wide 155-degree field of view. The video tops out at 4K at 60fps, and all camera settings are controlled from the menu on the goggles or the DJI fly app.
DJI Goggles 2
The new DJI Goggles 2 came in the Motion Combo box. They came with a battery, screen protector, headband, USB C power cable, and a USB C OTG cable that you will need to connect to your Apple or Android device for registering and setting up your drone.
The Goggles 2 are way more compact than the previous versions and, unlike their predecessor, have foldable antennas plus a screen protector, which is a lot easier to store.
My favorite part is the amazing 1080p 100fps view from crystal clear micro OLED screens with adjustable diopters. This is a game changer for someone who wears glasses with a range of -8.0D to +2.0D. The view is just stunning. The kit also includes little fittings for custom prescriptions. They might not work for everyone, as DJI points out that the goggles do not support astigmatism correction. But for me, they hit that perfect 50+ sweet spot.
I have used DJI’s FPV/ Fatshark analog and HD goggles for a long time, and after looking through these, it’s going to be hard to look at anything below 1080p. I feel the change from the V1 FPV goggles to the Goggles 2 to be as dramatic as going from analog to HD. The view is that good.
They do get a little hot on your face after 18 minutes of flying. I would have loved a little fan in there. I also found the foam on the top to be a little thin for my head.
The Goggles 2 also have head-tracking. You enable this and other functions with a small touchpad on the right side of the goggles. For head tracking, you need to swipe down and select the gyroscope-looking icon. Once enabled, the drone will turn left and right where ever you look. And, the camera will move up and down as well. The sensation is trippy and will take a bit to get used to. You have to move the motion controller as well and re-center your head in the process. Nevertheless, it seems like it would be pretty good for people, like me, who usually pretzel themselves while flying.
The motion controller – is it good?
And finally, in this box of goodies is the motion controller remote. I must admit, I was not a fan when I first saw this thing.
Boy, was I wrong! This little controller is a game changer. It comes with its own lanyard, and its design is similar to traditional VR or game console remotes. It has familiar buttons that spread around the top and sides.
One of my favorite features is the motion controller’s emergency brake function. It stops the drone in its tracks. I was pretty surprised to see the frame swing 90 degrees in my field of view for the first time. It works differently from quickly releasing the throttle, which is a great way to inspire confidence when you’re getting ahead of yourself. Instead, the emergency brake button gives you a chance to take a breath, re-orient, and, if need be, will return your drone to its take-off location.
After downloading the DJI Fly app to my mobile device, I quickly registered and logged in. I also needed to update the various components and download the DJI Assistant 2 to my computer.
DJI Assistant 2 (Consumer Drones Series)
Unlike most apps on a Mac, the DJI Assistant 2 requires a few steps for installation. After opening the app, you need to open it under the Apple menu, your System Preferences, Security and Privacy, then click General. There, you will need to unlock the panel. After that, you should finally see the option of letting the system install the app. That’s not quite everything, though. Clicking back on the installer will open your terminal window. Here you need to type your password, press return, and restart your computer. After that, you should be good to go.
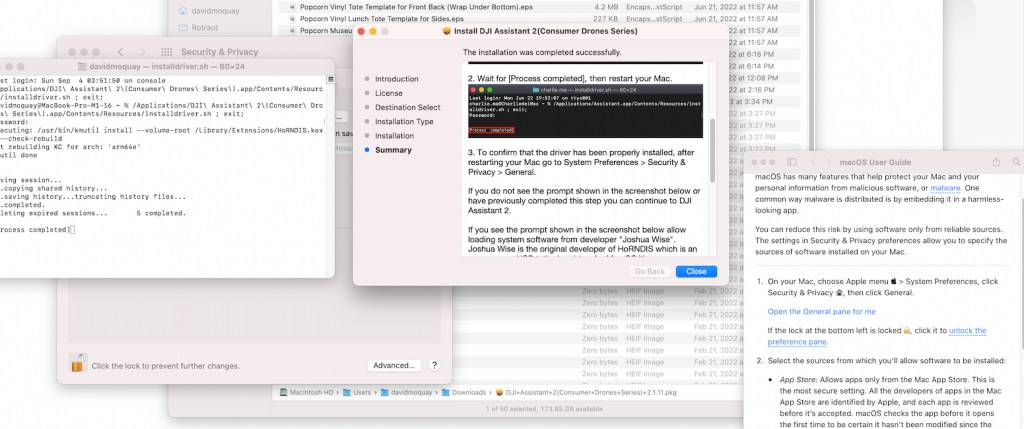
One additional weird quirk I found – make sure to plug in the supplied USB-C OTG cable and appropriate USB adapter to your computer. Using a regular USB-C cable straight to the Mac failed to connect with the app.
DJI Avata ease of use and the first flight
After updating and binding all the components taking a quick look at where I could fly outdoors in Paris (nowhere I could see) on the DJI app, I tried the Avata indoors.
With a double tap on the motion controller’s only red button, the motors roared to life. One long press, and the Avata rose straight up as if on rails. Tilting the motion controller left or right rotates the drone left or right. When I pitched the motion controller forward and back, I could see the camera lowering and raising itself, but the drone stayed absolutely still. Once I put the goggles on, everything became crystal clear.
There is a little white circle that appears in the goggles. Wherever that circle is is where the drone will go. When you tilt the motion controller, the circle moves smoothly across your field of view and is a massive help in letting you know exactly where you are going. With that added confidence, I immediately passed the drone to a friend who had never flown with goggles before. Like me, he was stunned at how easy it was to fly indoors. Next, I had a couple of neighbors come over, and each one took a supervised turn with equal delight.
Outdoors and indoors
To test the drone outdoors, I visited my brother George’s art studio and house that are about one hour outside of Paris. It’s in a small village, near open farmland – a perfect setting to test the drones outdoors and in a much more interesting indoor environment.
I was able to fly inside his studio with ease, flying the Avata right up to the ceiling support beams, smoothly out the window, into the courtyard, into the adjacent building through the door, trhough another window, and back again. I felt it was easier to fly slowly and smoothly with the motion controller than it would have been on my similar-sized Cinewhoop and GoPro.

Flying the drone on open farmland, I could test how low and fast I could race over the ground. A quick click on the motion controller switched from Normal to Sport mode, and I was racing 10 inches above the ground at 30 mph. I was amazed at how well this thing hugs the earth! The sensation of being so low to the ground makes going at any speed feel faster. It’s exhilarating. The downward collision sensors have a lot to do with it. They are just fantastic – like having a protective bubble that stops you from crashing into the ground.

Climbing, however, felt much slower than my traditional FPV rigs. In S mode, it felt more like a smooth plane at full speed. This drone is an absolute screamer at full speed, as in LOUD. I can only imagine how loud this thing might be in manual mode, climbing at nearly 60 mph. We were flying a Mini 3 Pro at the same time, and the Mini is almost silent in comparison.
I did run into some trouble.
DJI Avata durability
Unlike the original DJI FPV Drone, the Avata is a survivor. With its rugged yet flexible propeller guard/ducted fan configuration, the Avata can take a hit and keep flying. In my testing, I’ve had two notable incidents where the drone crashed hard enough to cut off the engines.
The first was during a hand-off where the drone came too close to a wall of foliage and crashed to the ground on soft vegetation from about 12 feet with no damage whatsoever.

The second was a bit more dramatic. The Avata was flying ridiculously low to the ground on an open farm field at full speed in S mode, roughly 30 mph, when it hit a lone rock and cartwheeled across the field. I didn’t want to try turtle mode before inspecting it for damage. Turtle mode is engaged through the goggles menu. Upon retrieval and some dusting off, the only damage I could see was a tiny crack on the front left propeller guard. I also noticed that all the propellers left a small mark on the inside of the propeller guard but were otherwise undamaged.
I put the Avata back on the ground, restarted it, and went for another flight with no issues.
Range
DJI claims in outdoor environments clear of interference, the Avata will go up to 10 km or 6.2 miles in the United States, FCC, 2 km or 1.2 miles in Europe, EU, and finally 6 km or 3.7 miles in China, SRRC. This might be true in the middle of nowhere without a power line or cell phone tower in sight. However, I found that the environment and its interference, including concrete buildings and deep canyons, will significantly impact how far you can actually fly. The Avata automatically adjusts regions while connected to the DJI Fly app.
I also ran into a brownout trying to test the drone’s range. That’s where the goggles’ video feed suddenly drops off, leaving you with all static or blue screens.
I was racing down a dirt road with open farmland to the left and a row of trees to the right when the video broke up well before the expected mile range. Luckily I just released the trigger, and the drone just stopped and hovered there. I spun it back toward me and slowly made it back until the video recovered, and I could continue flying normally. Unfortunately, my spotter told me I might have gotten too close to the high-tension tower right behind the tree line.
Traveling with the Avata
The whole kit with a battery is surprisingly small. I could easily fit the drone, goggles, and motion controller in my photo bag with room to spare for a full-size camera, lenses, and gear with no additional protection — nothing to unscrew or specially pack. Just drop it in and go.

Going through airport security is a lot easier — no need for bags within bags. With the goggles’ screen protector on, it was easy to grab the three components from my camera bag during a thorough security screening, lay them out on the security tray, and pull the whole lot back in again. If you’ve gone through security with carefully packed custom gear, you will appreciate this.
Since I had planned to go to Venice, Italy, I took the Avata with me. Once at our Airbnb, I started the DJI fly app, and couldn’t find any approved flying site. I asked the local police where I could fly my palm-sized drone, and they told me in no uncertain terms that I couldn’t fly it outdoors anywhere. I did film the inside of our apartment with great enthusiasm.
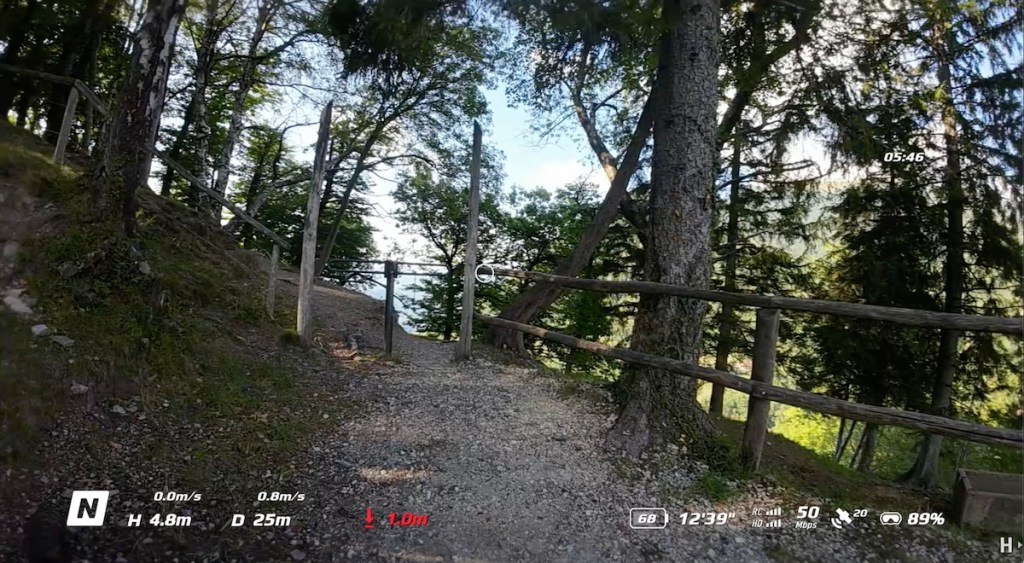
Next stop, Switzerland! There I was lucky enough to fly the Avata in the mountains and woods. The views were stunning, and flying up and down the trails and through the trees was pure magic. This setup is a lot easier to deal with than an ordinary FPV drone. I didn’t have to fiddle with strapping a battery on or the battery plug, or the GoPro, and I can fly for more than 10 minutes.

The view through the new goggles is stunning. Flying through the trees with the new motion controller was so intuitive that I quickly passed the drone to my friend and spotter who had taken me to these locations. Again with limited experience, he had no problem slaloming between trees at 10 inches off the ground. Leaves looked particularly cool being blown in the trail of the speeding Avata.
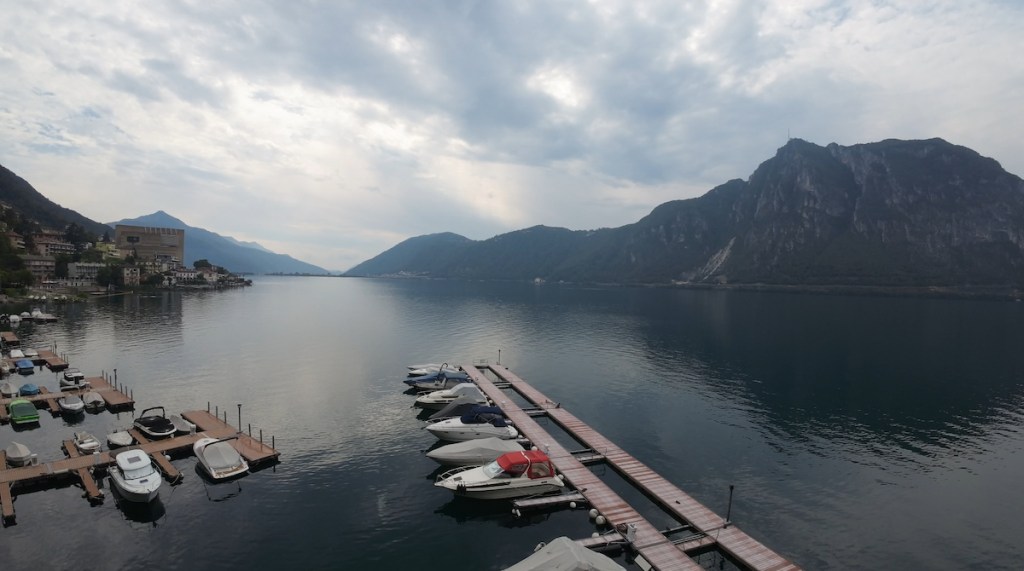
My host took me down to the valley near the lake back in Italy. There was a small marina and an abandoned parking structure a half mile away. Taking the Avata out of my camera bag was a breeze. I was up and running in less than three minutes. Flying over water between the boat masts was incredible with the new goggles with the 1080p video feed. I could see every line, pole, cable, cord, and wire in my way. Once inside the abandoned parking structure, I could see the video break up a bit, but after passing through a bunch of reinforced concrete pillars, nothing dramatic. I just instinctively released the throttle, and the Avata stopped in its tracks with absolutely no drifting. I enjoyed another exhilarating 10 minutes of darting in and out of the garage. And, I returned home with 20% of battery capacity left.
Back in Paris, I tried one more time to find a location to test the drone and ended up at the Police station. More precisely, I was lucky enough to get a tour of a police motorcycle garage and its rich history of the motorcycle and public service. There I encouraged some of the officers to try the view from the goggles and, after having received permission, flew around the garage and through the building trusses with ease. I did have an issue going behind a concrete pillar at the end of the room where Avata’s ground sensors started to lose reference. I released the trigger and made my way through the trouble spot with ease. Keep in mind the dark and low-lit areas you fly in and the limitations of your gear’s sensors.
At this point, you should probably be flying in M mode and release the full fury of this drone with the additional Remote DJI FPV Drone Remote controller 2, which will set you back another $179.
Is the Avata worth it?
First, let’s look at the cost. This Pro-view combo, as reviewed, will set you back a whopping $1,517. That might seem steep, yes. But, consider that a similarly specked CineWhoop kit, ready to go with a GoPro would set you back more than $1,700. And, that won’t have GPS and downward-facing collision sensors or fly as long or be as easy to use or give you buttery smooth footage straight out of the box.
You can get much lighter frames that will go faster and farther. Kits with better image quality will cost more. There are cheaper kits as well, for those first learning FPV. With those, you will develop additional and very valuable flying, soldering, fine-tuning, and video post-processing skills. There are tons of resources available online to get you started. But, if you’re starting from scratch and want a ready-to-go, out-of-the-box, minimal set-up option, this combo is hard to beat.
Video and photographers
The photographers and video creators I’ve shown this drone to have been blown away by the ease of use, quality of the video transmission, and the immersive flying experience of the Avata.

They’ve flown other videography and photography-type drones with their phones and tablets, Mavic, Phantom, etc. – but never with goggles. The were too afraid to break something. The steep learning curve and lack of experience both in flying and replacing components have always turned them off from the FPV-type drones.
With the advanced downward sensors, propeller guards, and the ridiculously easy-to-use motion controller, this diminutive palm-sized drone is a different story. Shots that were the pride of experienced FPV pilots are now within grasp. Prepare to see stunning footage on social media from this drone as long as it’s shot in D-Cinelike. I found that the resulting video set to standard color mode with auto iso will blow out the whites and crush the blacks a bit too much for my taste.
Will it replace larger, more sophisticated rigs used in professional environments? If you have used GoPro-type footage in your production, then yes. Especially in the hands of professional FPV pilots and FPV cinematographers who want to go places only this drone could fit for as long as it can fly. But in demanding production environments, that little sensor is not going to replace the larger, more capable and far more expensive rigs used. For the rest of us common mortals, with ideal lighting conditions, it’s a great way to get absolutely stunning footage with ease.

DJI virtual flight simulator
Once installed and registered on your iOS/android device, you can use the app by itself or connect to your goggles with either your remote or motion controller. The app has valuable tutorials that will teach you about all aspects of your system and a simulator. The simulator, in theory, will teach you valuable flying skills.
In reality, I found the experience to be NOTHING like flying a normal drone. I’m not talking about the video quality of the simulation, which I think is invaluable for newcomers, I felt the controls to be much smoother and more responsive in the real world. I couldn’t get around a building in the simulator without bumping into it, and I’m zipping around trees in the real world.
I’m sure the application will be updated and quickly improved. Right now, I found the experience a bit buggy and clunky. In the motion controller simulator, everything was working until it came to switching modes. I kept clicking on the button to no effect and pretty much had to quit the motion controller tutorial there and move on.
That being said, if you can zip around the simulator without hitting anything, I would imagine you would develop mad skills in the real world. Just do not be zipping at 60mph in places you shouldn’t be.
Safety and Remote ID
The DJI fly app provides a wealth of information and settings related specifically to safety. From downloading the latest updates to restricted flying zones and, hopefully soon, a lot more flying sites. In the application, you can restrict Avata’s max altitude and range and other safety features.
The downward-facing binocular vision and infrared sensors prevent the drone from hitting the ground in S and N mode only and work remarkably well. Keep in mind it’s not perfect, and be careful over featureless and reflective surfaces like water and smooth concrete. Be on the watch out for scenarios where the ambient light changes dramatically. There are no other collision sensors. If you are flying 10 inches off the ground and heading toward an 11-inch rock, you will hit it, bounce, and go back for more.
In addition, the Avata comes with an ADS-B sensor and RID capabilities, which only work if you have connected the goggles to your Android and iOS device and launched the DJI fly app.
From my understanding, as long as your phone is connected, your drone will be compliant with the new RID rules that start later this month in the United States.
DJI points out you do not need the app to actually fly, which could come in handy indoors and in other areas with no cell phone reception.
Final thoughts
I found the Avata to be an absolute blast to fly. In my opinion, this is the easiest FPV Drone to get up and fly and be able to do so comfortably and confidently, inches from the ground, in minutes.
It will definitely be my go-to drone if I want to hug the ground for insanely smooth shots. Both S and N modes are so much fun with the motion controller.
It is a bit heavy and loud. I would not try to compete with an FPV racing drone, but I certainly would not mind flying the track with one.
It won’t replace my sub-249g setup either. But it will replace my similarly sized Cinewhoop. It’s more compact, gives me longer flight times, is way more fun, is smoother to fly, and is easier to travel with.
If you happen to have flown drones before and have wanted to try FPV but didn’t think you had enough skills to do so, I can’t recommend this drone enough. The ridiculously intuitive motion controller smooths out shaky hands and gives you the ability to stop on a dime at a moment’s notice, and downward-facing sensors and GPS give you the confidence your drone won’t collide with the ground or drift away. You have will have no problem mastering epic smooth shots with the Avata in no time.
FTC: We use income earning auto affiliate links. More.

Comments